Tuesday, June 14, 2011

Dinner on the Road, Part II

While we were visiting my new nephew and his family in New York, I took the opportunity to assuage my guilt.  He was born about seven weeks ago, but since we live so far apart, this was our first opportunity to visit.  If we lived closer, I would have brought a complete meal to his mommy, daddy, and big sister in the first week.  That’s how I like to take care of new mommies and welcome new babies!  Since I didn’t get to bring them a meal right away, I decided I would cook a meal for them while we visited and give my sister-in-law a night off.  I know how much I always appreciated a night off, no matter how old my baby was!  I wanted something I could freeze and take along in a cooler, but finish cooking there.  I thought about several casseroles, but I settled on a yummy recipe I got from Cook’s Country last year and that has since gone into heavy rotation in my meal schedule.  Chicken Parmesan Roll-ups are a nice twist on Chicken Parm, which I make fairly often.  This version is quick-cooking—another of their 30 Minute Meals—and has great flavor.  First, the recipe, then I’ll describe how I made it portable.

Chicken Parmesan Roll-ups

¼
1
onion , chopped fine
6
garlic cloves , minced
1
(14.5-ounce) can diced tomatoes
½
cup chopped fresh basil
1 ½
cups shredded mozzarella cheese
½
6
thin-cut, boneless, skinless chicken cutlets , about 1 1/4 pounds
½
cup panko bread crumbs

1. Adjust oven rack to upper-middle position and heat oven to 475 degrees. Heat 2 tablespoons oil in medium saucepan over medium heat until shimmering. Add onion and cook until softened, about 3 minutes. Stir in garlic and cook until fragrant, about 30 seconds. Add tomatoes and simmer until slightly thickened, about 5 minutes. Off heat, stir in half of basil. Transfer half of sauce to 8-inch square baking dish.

2. Combine mozzarella and Parmesan in medium bowl; reserve ½ cup. Add remaining basil to remaining cheese. Pat cutlets dry with paper towels and season with salt and pepper. Top cutlets with basil-cheese mixture, leaving 1-inch border at bottom of cutlets. Roll up tightly and arrange, seam side down, in prepared baking dish.

3. Toss bread crumbs with remaining oil in small bowl. Top chicken with reserved cheese, remaining sauce, and bread-crumb mixture. Bake until chicken is cooked through and crumbs are golden, 15 to 20 minutes. Serve.

I actually broke this recipe up into two stages since I was transporting it.  At home, I made the roll-ups first and froze them in two layers in a Tupperware freezer container.  Since I was feeding four adults and four kids, I roughly doubled the recipe.  I didn’t really measure the amount of chicken.  I got two large packages of fresh boneless skinless chicken breasts and cut them into cutlets, getting about four good cutlets per breast, and there were two large breasts per package.  I am still not great at making chicken cutlets, so I had lots of trimmings that didn’t make it as roll-ups, but that was no problem—I used those for the Chicken,Charred Tomato, and Broccoli Salad.  Usually I would just use thawed frozen chicken breasts, but I knew I wanted to freeze the roll-ups for traveling, so I had to start with fresh this time.  If I can plan ahead well enough, I might stick with the fresh chicken for this recipe in the future, because they were easier to cut and pound than the thawed usually are. 
To make a simple recipe even simpler, I skipped measuring mozzarella and parmesan and instead used the Italian blend shredded cheese from Aldi, which had both types of cheese in the blend anyway.  I chopped up a ton of fresh basil, stirred it into a large helping of cheese in a small mixing bowl, and started rolling.  I had a wide variety of sizes of cutlets, but I figured that would work out since I would be serving a wide variety of sizes of diners.  It wasn’t particularly pretty, but here’s what I had to pop in the freezer the night before our trip:


The chicken traveled well buried in ice in the bottom of a cooler, and thawed in the fridge after we got to New York.  When it was time to make dinner, I put together the sauce (I took all the ingredients with me, figuring that if we lived closer I wouldn’t have raided her kitchen to make dinner for them!)  I roughly followed the recipe, adapting it slightly to double the amount of sauce and adding a bit here and there to make it more like the Quick Tomato Sauce I love.  The two recipes are pretty close to begin with, so it wasn’t much of a change.  Once the sauce had a few minutes to bubble, I poured a bit in an 8x11 baking dish (I think, although I didn’t measure it.  It was smaller than 9x13.)  In went the roll-ups, which packed in there pretty tightly. 


Next came the same Italian blend cheese I used for the filling:

No measuring--just keep sprinkling until it looks good
 And then the panko bread crumbs.  I got these panko crumbs at a discount grocery to give them a try, and I like them, but before I found them I always just tossed some slightly stale bread in the food chopper and toasted it very lightly in the toaster oven, and the results were pretty much the same.  I don’t think I’ll probably buy panko again.  Unless Aldi has it.  I’ll try almost anything there once.
Whoops!  After I generously sprinkled on the panko, I realized that a layer of sauce was supposed to go under there.  Crap.  I briefly entertained the idea of pouring the sauce over the crumbs, but their crunch is an important part of the appeal of this dish, so I decided to bake it and serve the sauce on the side.  Twenty minutes later we had this:


And that’s the last picture I have of this dish.  Once it was on the table with sides of pasta, sauce, a green bean-wax bean-carrot blend, and a big bowl of Fluff for dessert, it was gone in a flash.  It worked out fine without the sauce on top, although the sauce on the side was gone pretty fast.  I should have more than doubled that to feed our hungry crowd.  Kids and adults alike devoured it, and there was one little roll left for someone’s lunch the next day.

If you’re making this, and you want to make it even quicker and you aren’t as fanatical about homemade sauce as I am, you can really streamline it by using a good jarred sauce instead.  It’s an easy dish that’s impressive enough for potlucks or even a dinner party, but easy enough to make for a weeknight family dinner.  If you try it, let me know how it turns out for you!

Monday, June 13, 2011

Dinner on the Road

I’m back!  It feels like forever since I last posted.  Rest assured I have not taken a vacation from cooking—my family still needs to eat!  We did take a little vacation last week though, to visit our new nephew and his family in New York, which is one of many reasons I haven’t been able to post.  The trip was a long one (about seven hours,) but it’s a beautiful drive and we had a lovely day to travel.  In the summer, when we can, I like to pack a picnic for our big pit stop on long trips.  The Rev loves sandwiches, and so do I, but this time I wanted to do something a little different.  I decided to make a salad that has become a favorite of ours.  I first discovered this recipe on delish, the food site that is featured on the msn.com homepage.  It is insane how tasty it is, it’s not at all labor intensive, and it’s easy to make ahead before the day really heats up in the dog days of summer.  I’ve tweaked the original recipe a good bit, and I’ll share those tweaks and some tips and tricks, but first here’s where I started.  Don’t be intimidated by the length of the instructions; this is a true 30-minute meal.  The first three steps take place pretty much simultaneously, and you can easily shred the chicken while the tomatoes cook.  It probably took me less than 30 minutes to make it, since I’ve got the steps pretty much down.


1 ½  pounds boneless, skinless chicken breasts, trimmed, or 3 cups shredded cooked chicken breast (skip Step 1)

4 cups broccoli florets

1 ½  pounds medium tomatoes

2 teaspoons plus 3 tablespoons extra-virgin olive oil, divided

1 teaspoon salt

1 teaspoon freshly ground pepper

½  teaspoon chili powder

¼  cup lemon juice

  1. Place chicken in a skillet or saucepan and add enough water to cover; bring to a simmer over high heat. Cover, reduce heat and simmer gently until the chicken is cooked through and no longer pink in the middle, 10 to 12 minutes. Transfer to a cutting board. When cool enough to handle, shred with two forks into bite-size pieces.
  2. Bring a large pot of water to a boil, add broccoli and cook until tender, 3 to 5 minutes. Drain and rinse with cold water until cool.
  3. Meanwhile, core tomatoes and cut in half crosswise. Gently squeeze out seeds and discard. Set the tomatoes cut-side down on paper towels to drain for about 5 minutes.
  4. Place a large heavy skillet, such as cast-iron, over high heat until very hot. Brush the cut sides of the tomatoes with 1 teaspoon oil and place cut-side down in the pan. Cook until charred and beginning to soften, 4 to 5 minutes. Brush the tops lightly with another  1 teaspoon oil, turn and cook until the skin is charred, 1 to 2 minutes more. Transfer to a plate to cool. Do not clean the pan.
  5. Heat the remaining 3 tablespoons oil in the pan over medium heat. Stir in salt, pepper and chili powder and cook, stirring constantly, until fragrant, about 45 seconds. Slowly pour in lemon juice (it may splatter), then remove the pan from the heat. Stir to scrape up any browned bits.
  6. Coarsely chop the tomatoes and combine them in a large bowl with the shredded chicken, broccoli and the pan dressing; toss to coat.  Serve warm or at room temperature.

I promise you that you aren’t prepared for how delicious these simple flavors are when you marry them in this salad.  But first you have to get past how it looks.  Every time I make this, I pour the dressing from the pan and note that it looks like sludge, and I think, "Oh, crap, I screwed it up and it is going to suck this time." And every single time, I am amazed at how fabulous it tastes!


The dressing--it's not pretty, but the flavor is amazing!

I coarsely chopped the tomatoes on the same platter where I shredded the chicken.
 But what about those tweaks?  For starters, I prefer to use Roma or plum tomatoes--they hold their form a little better for turning, and they fit in the pan better.  I cut them lengthwise and cut out the seeds and gel, but with Romas you still get plenty of flesh left behind for great tomato flavor.  I use fresh broccoli florets because my family prefers fresh broccoli year-round and Aldi makes it affordable, but you could just as easily use a good-quality frozen broccoli (I wouldn’t use Aldi in that case, because I’ve found that their frozen broccoli is more stems than anything else.)  Just be sure not to over cook it.  You want the broccoli to be just a little bit crisp. 

Tomaotes smoking away in the cast-iron skillet
As for tips and tricks—one of the reasons I love this recipe is that I can forget to thaw the chicken (as I am known to do) and it still works just fine.  If you’re poaching chicken breasts, you can drop the frozen pieces right in the water.  That goes for any recipe that calls for poaching.  You’ll just need to let them cook a bit longer—around 20-25 minutes, depending on the thickness of the pieces. 

You have to use a cast iron pan for this one, and it has to be HOT. As in, it should be actively smoking.  I put my gas burner on high and let it go for a couple of minutes.  Keep in mind that cast iron holds the heat like crazy, so as soon as you get the tomatoes out, turn the heat way down.  If you have an electric cooktop instead of gas, I would consider moving the pan to a new burner turned to medium for making the dressing, because electric burners hold the heat, too.  A silicone scraper is a must-have for getting the dressing and all the yummy bits out of the skillet without adding bits of melted scraper, too. 

When the recipe says the lemon juice "may" splatter, they are joking. It will DEFINITELY splatter. A LOT. You can (should) use a splatter screen, or if you don't have one (like I didn't) you can hold the lid from a large pan to protect yourself from the splatter. Either way, you'll be cleaning up a lot of grease from your stovetop, but it is worth it.  And either way, I‘d recommend wearing either a potholder that covers at least to your wrist, or a rubber glove to protect the hand you use to stir the dressing.


When I make this recipe at home, I like to make Rachel Ray's Zucchini and Spaghetti on the side, but for the picnic I wanted something that could travel and would compliment the flavors of the salad without competing with or repeating them.  I invented a pasta salad using what I had in my pantry and fridge.  I started with tri-color rotini, and I added whole olives, diced red peppers and celery, balsamic vinaigrette, and crumbled gorgonzola.  I was going for similar flavors to my favorite savory mixed green salad.  The peppers were leftovers from the veggie tray I made for a backyard party, and they stood in for roasted red peppers, which I would have preferred, but I was out.  I can’t imagine a pasta salad without celery, and the olives were for me (I love them, The Rev not so much.)  I sprinkled on a generous helping of the cheese and packed the dressing separately, tossing it just before we ate.  The kids weren’t big fans, but I loved it.  We rounded out the meal with some fresh fruit, and our little roadside picnic looked downright gourmet!

Tuesday, May 31, 2011

Let the Grill Do the Work

We celebrated Memorial Day by going to war on the mess in our house.  It was the hottest day we’ve had so far, and we were worn out from housework, so at dinnertime we wanted something quick that didn’t heat up the house.  To the grill!  We first tried this flank steak recipe last spring, serving it to guests, and it was a hit.  I like it because it doesn’t require the advanced planning of a marinade.  The recipe comes from Cook’s Country, and is one of their 30 Minute Meals.
Grilled Flank Steak with Charred Sweet Onion Relish
Serves 4

1
flank steak (about 1 1/2 pounds)
1
red onion , peeled and cut into 1/2-inch rounds (see note)
2
tablespoons  vegetable oil 
¼
cup  red wine vinegar 
1/8
teaspoon  cayenne pepper 
3
tablespoons  brown sugar 
1
tablespoon  chopped fresh parsley 

1. Pat steak dry with paper towels and season with salt and pepper. Brush onion rounds with 1 tablespoon oil and season with salt. Grill steak over hot fire until well browned and cooked to desired doneness, about 5 minutes per side for medium-rare. Grill onion until charred and soft, about 5 minutes per side. Transfer steak and onion to cutting board and tent with foil.
2. When cool enough to handle, chop onion coarsely. Heat remaining oil in small saucepan over medium heat until shimmering. Add onion, vinegar, sugar, cayenne, and any accumulated beef juices and simmer until thickened, 3 to 5 minutes. Off heat, stir in parsley. Slice steak thinly against grain. Serve steak with relish.

Onions and flank steak ready for the grill
Charred onion relish thickening on the stove

It's important to slice the steak thinly across the grain


I wasn’t perfectly faithful to the recipe.  I didn’t have red onion, but the yellow onion I did have worked fine.  I also didn’t have any cayenne pepper, but since the relish already had vinegar in it, I figured a similar amount of hot sauce would do, and it did.

When I was writing a previous blog post last week, I ran across this recipe on Cuisine at Home and thought it would be the perfect side here.
Grilled Steak Fries with Dijon Mayonnaise
Makes: 8 servings
Total time: 30 minutes

FOR THE FRIES:
4
large russet potatoes, each cut into 8 wedges
3
Tbsp. extra-virgin olive oil
Salt and black pepper to taste
1
cup shredded Cheddar cheese
FOR THE SAUCE:
1
cup mayonnaise
2
Tbsp. Dijon mustard
2
strips bacon, diced and fried until crisp
2
Tbsp. chopped scallion

Preheat grill to medium. 
Toss potato wedges with oil, salt, and pepper. Grill potatoes, uncovered, until tender when pierced, 10–15 minutes. Turn potatoes halfway through to create grill marks on both sides. Transfer potato wedges to a foil pan or a baking dish; sprinkle with Cheddar. Turn off grill; place pan on grill to allow residual heat to melt Cheddar. 
Combine mayonnaise and Dijon for the sauce in a small bowl. Garnish with bacon and scallion.
Since I already had the vegetable oil out for the flank steak recipe, I just used that instead of olive oil.  I halved the recipe, and I edited the sauce a bit, omitting the scallions, using real bacon bits instead of going to the trouble of frying bacon, and I added about ½ teaspoon of prepared horseradish.  It was delicious!


To round out the meal I made a salad from the fresh spinach my in-laws brought from their garden this weekend, a couple of fresh strawberries, some honey roasted almonds, and feta cheese. 


Looks as good as it tastes!
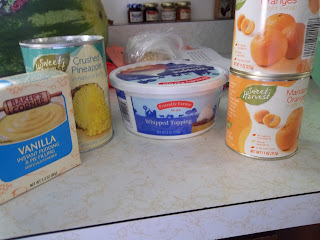
For dessert, I made a summertime favorite—we call it Fluff.  I’ve also called it Pot of Gold, but that was because I was taking it to a St. Patrick’s day potluck.  Whatever you call it, you’ll love it!  It’s cool and refreshing, and it works as a dessert or a fruit salad, if you’re not too picky about the definition of "salad."  I put it together at lunch because it’s so much better if it has a couple of hours to chill, but you can eat it right away, and believe me, I have.  I have the short list of ingredients on hand all summer long.
Fluff
1 lg. can crushed pineapple
1 box instant vanilla pudding
2 sm. cans mandarin oranges, drained and snipped into bite-sized pieces (I just use kitchen shears right in the can)
1 tub whipped topping


Drain the pineapple over a bowl, reserving all the juice.  Press out as much juice as you can.  Whisk the instant pudding mix into the pineapple juice, whisking constantly for at least two minutes to thicken.  Fold in the pineapple, oranges and the whipped topping until well combined.  Chill before serving.

I use a fine mesh strainer to make sure I get out as much juice as possible.

Folding the fruit into the thickened pudding

It looks great even before it chills and sets up some more!
You can make this a bit healthier by using the fat-free whipped topping, but the one time I tried that it didn’t seem to set up very well.  That may be because I didn’t whisk it long enough, though.  You could also use sugar-free pudding.  The Rev has asked that I put flaked coconut in, too.  Next time I try it, I’ll let you know how it turns out.  I suspect the coconut will only ratchet up the awesomeness.

Monday, May 30, 2011

Slow Cooker Saves the Day


Saturday was quite a day.  I am the chairwoman of the Funeral Dinner committee at our church, and on Saturday we served a funeral dinner to 150 people.  Yes, 150 people.  A funeral dinner at our church entails the committee preparing two meat dishes, and serving sides that are generously donated by the women of our church.  And boy, can those ladies cook!  Typically, a funeral dinner is served to about 30-60 people, but sadly, this funeral was for a relatively young woman who was beloved by many people.  Her parents are active members of our church and have an extensive community of their own who turned out to support them in their time of grief.  It is an honor to be a part of the ministry of providing a funeral dinner like we do, and I am proud of what we were able to do on Saturday.  It took pretty much my entire day, though, and I knew that after spending a full day in the church kitchen I would not be keen on spending much time in my own.  So I tried to plan ahead.  In my meal plan for the week, I had planned to have The Rev grill our dinner, but he was pretty busy with the funeral itself, plus we had the added complication of Middleman waking up sick that morning, and Oldest playing in his second Tball game of the year.  Whenever either of us wasn’t at the church, we were at home comforting a sick boy.  Fortunately, my father-in-law was able to help take care of the kids, but neither of us was in any shape to do much cooking come dinnertime.  Slow cooker to the rescue!  I switched up my meal plans, moving Pork BBQ to today and pushing the grilling to later in the week.  I put the pork in the slow cooker before I left in the morning, and all The Rev had to do at dinnertime was shred the meat and pour on a little bottled barbeque sauce.  Sides were leftovers from the funeral dinner.
Pork BBQ Sandwiches
Pork roast (I think I got a shoulder roast on sale,) whatever size will fit in your slow cooker
Salt and pepper
Celery salt
¼ c. water
Bottled barbeque sauce
Rolls
Pat roast dry and sprinkle with salt and pepper and celery salt on all sides.   Place in slow cooker and pour ¼ c. water over roast.  Cook on low for 6-8 hours, until meat is falling apart.  Remove meat to a platter or shallow dish.  Remove any bones and large chunks of fat.  Shred meat with two forks and move to a serving bowl.  Pour your favorite bottled barbeque sauce over the meat (our choice is Sweet Baby Ray’s,) enough to moisten the pork.  Spoon a little of the broth from the slow cooker over the meat and sauce and stir to combine.  Add more sauce as you like, or pass at the table.  Serve on crusty rolls.  Reserve the yummy broth for another recipe.  It freezes well and is great for making gravy or punching up soupbeans.

Dinner prep took less than ten minutes in the morning
The beautiful sides were leftovers from the funeral dinner.  Fantastic salads!

An Old Favorite with a New Name

Years ago, when my mom first made this recipe, one of us asked what we were having for dinner.  For some reason, my mom replied, “Hogslop!”  This dish has lived by that name ever since.  My mom actually hates that I call it that, but I say it with such affection!  This is a wonderful, hearty, filling casserole that is a one-dish dinner if you have a cast-iron skillet.  The original recipe came from an old Campbell’s soup cookbook, so of course it includes the convenience of a good old can of cream of mushroom.  It also calls for sautéing strips of sirloin in butter—not exactly low-fat!  Of course my mom used ground beef way back when because that’s what she had, and I’ve stuck with it.  I’ve tried to make the recipe a little healthier, and I’m thinking that next time I make it I might try skipping the canned soup in favor of making my own creamy mushroom base.  But that’s another blog post!
Hogslop
2 c. wide egg noodles, uncooked
1 lb. lean ground beef
½ onion, diced
¼ tsp. dried thyme leaves
1/3 c. low-fat sour cream
1 can cream of mushroom soup
½ c. water
1 can green beans, drained (I used a pint of home canned beans from my aunt)
½ c. Italian-style dry bread crumbs
Cook noodles according to package directions, salting the water well to flavor the noodles.  Meanwhile, brown ground beef in a cast-iron skillet over medium heat (an oven-safe nonstick skillet should also work, or you can finish the casserole in a baking dish.)  After a couple of minutes, add the onion to cook with the ground beef.  Add thyme (I never actually measure it) and salt and pepper to taste.  When the meat is fully browned and the onion is softened, drain fat if necessary.  Turn the heat to low and stir in the sour cream, soup, and water.  Stir in the drained green beans.  Allow to simmer while the noodles finish cooking.  Carefully stir in the noodles (a 10-inch skillet will be pretty full.)  If your skillet is not oven-safe, pour mixture into a baking dish that can go under the broiler.  Top with bread crumbs (something else I don’t measure; use what looks good to you.)  Place the skillet under the broiler on high until crumbs are lightly browned.  Serve straight from the skillet.
 
Bubbling away in the cast iron skillet

Sprinkling on the bread crumbs.  Note how full the skillet is!

Nicely browned after just about 5 minutes under the broiler

There you have it—a complete meal in one skillet, and on the table in about a half an hour.  I usually serve some sort of fruit on the side.  Tonight it was homemade applesauce from the freezer.  This is a favorite comfort food in the winter, but it’s a pretty good choice in the warmer months when you want something hearty but you don’t want to heat up the kitchen by running the oven.  It’s great as leftovers, too!

The total package--hearty casserole and homemade applesauce

I actually made this dish earlier in the week when I was visiting a mom who just had a sweet new baby boy.   My visit was last-minute, so I didn’t have time to make a casserole to take to her, as I usually would.  Instead, I raided her cabinets to see what she had that I could work with.  Instead of canned green beans, she had frozen, so I just threw a handful of beans in with the noodles for the last couple of  minutes they  were boiling.  Otherwise, I cooked it the same as I did for my family a little later in the week.  Instead of putting it straight from the stove into the oven, I poured everything into a 9x13 baking dish and slid it into the fridge.  All the new daddy had to do at dinner time was preheat the oven and bake until it was bubbly and browned on top.  I told my friend the story of the name, but we decided a nicer name would be Hamburger Stroganoff Casserole.  Is that better, mom?