Tuesday, May 31, 2011

Let the Grill Do the Work

We celebrated Memorial Day by going to war on the mess in our house.  It was the hottest day we’ve had so far, and we were worn out from housework, so at dinnertime we wanted something quick that didn’t heat up the house.  To the grill!  We first tried this flank steak recipe last spring, serving it to guests, and it was a hit.  I like it because it doesn’t require the advanced planning of a marinade.  The recipe comes from Cook’s Country, and is one of their 30 Minute Meals.
Grilled Flank Steak with Charred Sweet Onion Relish
Serves 4

1
flank steak (about 1 1/2 pounds)
1
red onion , peeled and cut into 1/2-inch rounds (see note)
2
tablespoons  vegetable oil 
¼
cup  red wine vinegar 
1/8
teaspoon  cayenne pepper 
3
tablespoons  brown sugar 
1
tablespoon  chopped fresh parsley 

1. Pat steak dry with paper towels and season with salt and pepper. Brush onion rounds with 1 tablespoon oil and season with salt. Grill steak over hot fire until well browned and cooked to desired doneness, about 5 minutes per side for medium-rare. Grill onion until charred and soft, about 5 minutes per side. Transfer steak and onion to cutting board and tent with foil.
2. When cool enough to handle, chop onion coarsely. Heat remaining oil in small saucepan over medium heat until shimmering. Add onion, vinegar, sugar, cayenne, and any accumulated beef juices and simmer until thickened, 3 to 5 minutes. Off heat, stir in parsley. Slice steak thinly against grain. Serve steak with relish.

Onions and flank steak ready for the grill
Charred onion relish thickening on the stove

It's important to slice the steak thinly across the grain


I wasn’t perfectly faithful to the recipe.  I didn’t have red onion, but the yellow onion I did have worked fine.  I also didn’t have any cayenne pepper, but since the relish already had vinegar in it, I figured a similar amount of hot sauce would do, and it did.

When I was writing a previous blog post last week, I ran across this recipe on Cuisine at Home and thought it would be the perfect side here.
Grilled Steak Fries with Dijon Mayonnaise
Makes: 8 servings
Total time: 30 minutes

FOR THE FRIES:
4
large russet potatoes, each cut into 8 wedges
3
Tbsp. extra-virgin olive oil
Salt and black pepper to taste
1
cup shredded Cheddar cheese
FOR THE SAUCE:
1
cup mayonnaise
2
Tbsp. Dijon mustard
2
strips bacon, diced and fried until crisp
2
Tbsp. chopped scallion

Preheat grill to medium. 
Toss potato wedges with oil, salt, and pepper. Grill potatoes, uncovered, until tender when pierced, 10–15 minutes. Turn potatoes halfway through to create grill marks on both sides. Transfer potato wedges to a foil pan or a baking dish; sprinkle with Cheddar. Turn off grill; place pan on grill to allow residual heat to melt Cheddar. 
Combine mayonnaise and Dijon for the sauce in a small bowl. Garnish with bacon and scallion.
Since I already had the vegetable oil out for the flank steak recipe, I just used that instead of olive oil.  I halved the recipe, and I edited the sauce a bit, omitting the scallions, using real bacon bits instead of going to the trouble of frying bacon, and I added about ½ teaspoon of prepared horseradish.  It was delicious!


To round out the meal I made a salad from the fresh spinach my in-laws brought from their garden this weekend, a couple of fresh strawberries, some honey roasted almonds, and feta cheese. 


Looks as good as it tastes!
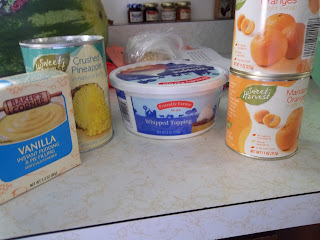
For dessert, I made a summertime favorite—we call it Fluff.  I’ve also called it Pot of Gold, but that was because I was taking it to a St. Patrick’s day potluck.  Whatever you call it, you’ll love it!  It’s cool and refreshing, and it works as a dessert or a fruit salad, if you’re not too picky about the definition of "salad."  I put it together at lunch because it’s so much better if it has a couple of hours to chill, but you can eat it right away, and believe me, I have.  I have the short list of ingredients on hand all summer long.
Fluff
1 lg. can crushed pineapple
1 box instant vanilla pudding
2 sm. cans mandarin oranges, drained and snipped into bite-sized pieces (I just use kitchen shears right in the can)
1 tub whipped topping


Drain the pineapple over a bowl, reserving all the juice.  Press out as much juice as you can.  Whisk the instant pudding mix into the pineapple juice, whisking constantly for at least two minutes to thicken.  Fold in the pineapple, oranges and the whipped topping until well combined.  Chill before serving.

I use a fine mesh strainer to make sure I get out as much juice as possible.

Folding the fruit into the thickened pudding

It looks great even before it chills and sets up some more!
You can make this a bit healthier by using the fat-free whipped topping, but the one time I tried that it didn’t seem to set up very well.  That may be because I didn’t whisk it long enough, though.  You could also use sugar-free pudding.  The Rev has asked that I put flaked coconut in, too.  Next time I try it, I’ll let you know how it turns out.  I suspect the coconut will only ratchet up the awesomeness.

Monday, May 30, 2011

Slow Cooker Saves the Day


Saturday was quite a day.  I am the chairwoman of the Funeral Dinner committee at our church, and on Saturday we served a funeral dinner to 150 people.  Yes, 150 people.  A funeral dinner at our church entails the committee preparing two meat dishes, and serving sides that are generously donated by the women of our church.  And boy, can those ladies cook!  Typically, a funeral dinner is served to about 30-60 people, but sadly, this funeral was for a relatively young woman who was beloved by many people.  Her parents are active members of our church and have an extensive community of their own who turned out to support them in their time of grief.  It is an honor to be a part of the ministry of providing a funeral dinner like we do, and I am proud of what we were able to do on Saturday.  It took pretty much my entire day, though, and I knew that after spending a full day in the church kitchen I would not be keen on spending much time in my own.  So I tried to plan ahead.  In my meal plan for the week, I had planned to have The Rev grill our dinner, but he was pretty busy with the funeral itself, plus we had the added complication of Middleman waking up sick that morning, and Oldest playing in his second Tball game of the year.  Whenever either of us wasn’t at the church, we were at home comforting a sick boy.  Fortunately, my father-in-law was able to help take care of the kids, but neither of us was in any shape to do much cooking come dinnertime.  Slow cooker to the rescue!  I switched up my meal plans, moving Pork BBQ to today and pushing the grilling to later in the week.  I put the pork in the slow cooker before I left in the morning, and all The Rev had to do at dinnertime was shred the meat and pour on a little bottled barbeque sauce.  Sides were leftovers from the funeral dinner.
Pork BBQ Sandwiches
Pork roast (I think I got a shoulder roast on sale,) whatever size will fit in your slow cooker
Salt and pepper
Celery salt
¼ c. water
Bottled barbeque sauce
Rolls
Pat roast dry and sprinkle with salt and pepper and celery salt on all sides.   Place in slow cooker and pour ¼ c. water over roast.  Cook on low for 6-8 hours, until meat is falling apart.  Remove meat to a platter or shallow dish.  Remove any bones and large chunks of fat.  Shred meat with two forks and move to a serving bowl.  Pour your favorite bottled barbeque sauce over the meat (our choice is Sweet Baby Ray’s,) enough to moisten the pork.  Spoon a little of the broth from the slow cooker over the meat and sauce and stir to combine.  Add more sauce as you like, or pass at the table.  Serve on crusty rolls.  Reserve the yummy broth for another recipe.  It freezes well and is great for making gravy or punching up soupbeans.

Dinner prep took less than ten minutes in the morning
The beautiful sides were leftovers from the funeral dinner.  Fantastic salads!

An Old Favorite with a New Name

Years ago, when my mom first made this recipe, one of us asked what we were having for dinner.  For some reason, my mom replied, “Hogslop!”  This dish has lived by that name ever since.  My mom actually hates that I call it that, but I say it with such affection!  This is a wonderful, hearty, filling casserole that is a one-dish dinner if you have a cast-iron skillet.  The original recipe came from an old Campbell’s soup cookbook, so of course it includes the convenience of a good old can of cream of mushroom.  It also calls for sautéing strips of sirloin in butter—not exactly low-fat!  Of course my mom used ground beef way back when because that’s what she had, and I’ve stuck with it.  I’ve tried to make the recipe a little healthier, and I’m thinking that next time I make it I might try skipping the canned soup in favor of making my own creamy mushroom base.  But that’s another blog post!
Hogslop
2 c. wide egg noodles, uncooked
1 lb. lean ground beef
½ onion, diced
¼ tsp. dried thyme leaves
1/3 c. low-fat sour cream
1 can cream of mushroom soup
½ c. water
1 can green beans, drained (I used a pint of home canned beans from my aunt)
½ c. Italian-style dry bread crumbs
Cook noodles according to package directions, salting the water well to flavor the noodles.  Meanwhile, brown ground beef in a cast-iron skillet over medium heat (an oven-safe nonstick skillet should also work, or you can finish the casserole in a baking dish.)  After a couple of minutes, add the onion to cook with the ground beef.  Add thyme (I never actually measure it) and salt and pepper to taste.  When the meat is fully browned and the onion is softened, drain fat if necessary.  Turn the heat to low and stir in the sour cream, soup, and water.  Stir in the drained green beans.  Allow to simmer while the noodles finish cooking.  Carefully stir in the noodles (a 10-inch skillet will be pretty full.)  If your skillet is not oven-safe, pour mixture into a baking dish that can go under the broiler.  Top with bread crumbs (something else I don’t measure; use what looks good to you.)  Place the skillet under the broiler on high until crumbs are lightly browned.  Serve straight from the skillet.
 
Bubbling away in the cast iron skillet

Sprinkling on the bread crumbs.  Note how full the skillet is!

Nicely browned after just about 5 minutes under the broiler

There you have it—a complete meal in one skillet, and on the table in about a half an hour.  I usually serve some sort of fruit on the side.  Tonight it was homemade applesauce from the freezer.  This is a favorite comfort food in the winter, but it’s a pretty good choice in the warmer months when you want something hearty but you don’t want to heat up the kitchen by running the oven.  It’s great as leftovers, too!

The total package--hearty casserole and homemade applesauce

I actually made this dish earlier in the week when I was visiting a mom who just had a sweet new baby boy.   My visit was last-minute, so I didn’t have time to make a casserole to take to her, as I usually would.  Instead, I raided her cabinets to see what she had that I could work with.  Instead of canned green beans, she had frozen, so I just threw a handful of beans in with the noodles for the last couple of  minutes they  were boiling.  Otherwise, I cooked it the same as I did for my family a little later in the week.  Instead of putting it straight from the stove into the oven, I poured everything into a 9x13 baking dish and slid it into the fridge.  All the new daddy had to do at dinner time was preheat the oven and bake until it was bubbly and browned on top.  I told my friend the story of the name, but we decided a nicer name would be Hamburger Stroganoff Casserole.  Is that better, mom?

Thursday, May 26, 2011

Indulging a Craving

I broke one of my cardinal rules tonight—dinner prep should be easy—in the interest of satisfying a craving.  We used to live in the Midwest, and I loved the pecan crusted chicken salad from a restaurant chain out there called O’Charley’s.  Northwest PA doesn’t have anything quite like O’Charley’s, and though TGIFriday’s has a decent version, there’s not one of those anywhere nearby either.  So, I had to figure out how to make a version of the salad myself.  Last fall I got a sample issue of the magazine Cuisine at Home. It looks like a good cooking magazine, but I already subscribe to three magazines with recipes that I use regularly, so I couldn’t really justify subscribing to this one, too.  However, I am happy to use the recipes they sent me for free!  I was excited to see a recipe for a pecan crusted chicken salad in the free issue.  I have adapted it for a little more convenience and to more closely approximate the O’Charley’s version.  As far as I’m concerned, it’s well worth a little extra work.
Pecan Crusted Chicken Salad
For the chicken:
½ loaf ciabatta bread, cubed
Handful fresh Italian parsley
Salt and pepper
¾ -1 c. pecans
½ tsp. dried oregano
½ tsp. dried thyme leaves
9 pieces boneless, skinless chicken tenderloins (I figured 2 per adult and 1 per child)
2 whole eggs
2 tsp. cornstarch
3 Tbsp. olive oil
For the salad:  (makes 3 dinner salads)
3 small heads lettuce greens (I use artisanal greens from Aldi)
1 sm. can mandarin oranges, drained and cut to bite-sized pieces
Dried berries (I like the mixed berries from Aldi, but I’ve made it with just cranberries)
1 c. whole pecans
Gorgonzola cheese crumbles
Sweet balsamic vinaigrette (I used store-bought this time, but it’s easy to make with a ratio of 2:2:1 of oil, sugar, and vinegar.  Adjust the sugar to your taste, and try mixing different vinegars such as raspberry, balsamic, white wine, etc.)

Preheat oven to 200o.  Place bread in food processor and process until you get crumbs.  There should be a range of sizes from pea-sized crumbs down to almost powder (see picture below.)  Work in batches if necessary to avoid overworking the food processor.  Spread crumbs on a rimmed baking sheet and place in oven to dry for 10-12 minutes.  Do not allow crumbs to toast.  Meanwhile, trim excess skin and fat from the tenderloins, if necessary, and pat dry with paper towels.  Beat together eggs and cornstarch in shallow dish (such as a pie plate.)  Pulse pecans, parsley, oregano, thyme, and salt and pepper to taste in the food processor until pecans are finely chopped.  Remove bread crumbs from oven and increase heat to 450o.  In a second shallow dish, combine bread crumbs and pecan mixture.  Set up an assembly line with the tenderloins, egg wash, crumbs, and a wire rack set over a rimmed baking sheet.  Dip each tenderloin in the egg wash, then roll in the crumbs, pressing the crumbs to the chicken to help them adhere.  Gently place each tenderloin on the wire rack (some crumbs will fall off.)  When all the chicken is coated, place the chicken on the rack in the refrigerator to allow them to air dry, 20-30 minutes.  This helps set the crust.  While the chicken is resting, wash, dry and tear the salad greens.  Toast the whole pecans in a toaster oven set to 300o until they are fragrant, about 5-10 minutes (you can also toast them in a dry skillet over medium heat on the stovetop if you don’t have a toaster oven.)  Fill three salad plates with greens.  Top with dried berries (or fresh if available,) mandarin orange pieces, toasted pecans, and gorgonzola cheese.  Use amounts of each that look good to you, according to your taste.  When it’s about time to remove the chicken from the fridge, heat olive oil in a large oven-safe skillet over medium-high heat, until shimmering.  Place the chicken pieces carefully in the pan, laying them toward you to allow loose crumbs to form a bed for the chicken.  Sauté until chicken is golden brown and crisp on one side, about 3 minutes.  Carefully turn with a spatula and transfer the skillet to the oven to finish cooking.  Roast chicken until done, 8-10 minutes depending on the thickness of the tenderloins.  Place tenderloins on top of salads (1-2 per salad depending on the size of the chicken pieces.)  Sprinkle any toasted crumbs left in the pan over the salads.  Pass vinaigrette at the table.
Cube the bread to help process it into crumbs

The crumbs shouldn't be uniform--look for a range from pea-sized to powdery

Breading assembly line

Phew!  It is a lot of work, but I love the flavors in this salad, and it will be easier the next time I make it.  That’s because I turned the whole loaf of bread into crumbs, but I put half in a freezer bag, so I have homemade crumbs already made for next time I want to bread something.  I didn’t dry them yet because depending on the recipe, I might want soft crumbs, and they’re easy enough to dry if I want, straight from the freezer.  I also had a good bit of the pecan breading mixture left over, and I froze that, too, so when I crave this salad again I only have to thaw the crumbs when I thaw the chicken.


I made some significant changes from the original Cuisine at Home recipe, which was actually a little hard to follow in the magazine because it was spread over several pages.  One article had a basic crusted chicken breast recipe, and several pages later was the pecan variation, with instructions for a pretty different salad.  I didn’t get as fancy with the spices as they called for.  I also chose to use the tenderloins rather than whole breasts, which the original recipe wants you to trim and pound to an even thickness.  I am still not proficient at the art of pounding chicken breasts, and the recipe is complicated and labor-intensive enough as it is.  The tenderloins are a little more pricey (not by much, as I get them at Aldi,) but I’ll pay for the convenience in this case. 


The recipe called for a non-stick pan but I had no problem in this one

Salad, just waiting for chicken

The O’Charley’s salad I love is actually a chopped salad with dried cranberries, mandarin oranges, candied pecans, and bleu cheese crumbles and comes with a sweet balsamic vinaigrette.  I don’t go to the trouble of chopping the greens, and I don’t candy the pecans—they taste great just toasted and they’re better for me.  Tonight I happened to have fresh strawberries on hand, so I threw those on, too.  In addition to the vinaigrette, we passed some raspberry vinegar at the table and the extra flavor a few sprinkles lent to the salad was really nice.

Ready to dig in!  I sliced the chicken once it was on my salad.
 One more thing I love about this recipe is that it is easy to make kid-friendly.  My kids aren’t into salad, so I just put all the other elements on their plates.  The tenders are chicken nuggets as far as the kids are concerned, and they like the fruits and even the nuts that top the salads.  I wanted them to have a little green as well, so I heated up some leftover broccoli.  We all ate well, and I miss the Midwest just a little bit less after this meal.


The kiddie version (watched over by Batman and friends)


Wednesday, May 25, 2011

Roasted Shrimp with Tomatoes


Tonight’s meal has Greek-inspired flavors and is everything I look for in a recipe—it’s super easy, fast, healthy, and frugal.  This is a true thirty minute meal that doesn’t use a lot of processed ingredients.  From start to finish, you really can have this on the table in thirty minutes, and you don’t have to be an expert with a chef’s knife to make it happen.  The entrée recipe comes from All You magazine.

Roasted Shrimp with Tomatoes

Ingredients
2 (14.5-oz.) cans diced tomatoes
2 tablespoons olive oil
2 cloves garlic, minced
Salt and pepper
1 ½ lbs. medium shrimp, peeled & deveined
1 teaspoon dried oregano

Preparation

1. Preheat oven to 450°F. Drain tomatoes, reserving ½ cup juice. Combine tomatoes, reserved juice, oil and garlic in an 8-inch square glass baking dish. Season with salt and pepper. Bake until tomatoes are bubbling, about 15 minutes.
2. Stir shrimp and oregano into tomatoes. Sprinkle goat cheese on top. Return to oven and bake until shrimp are cooked through, about 10 minutes. Serve immediately.

Tomatoes, garlic, and oil ready for the oven


While the tomatoes are roasting, it's a quick job to remove the tails from the shrimp

Adding the shrimp and feta--no measuring, just eyeballed it

This recipe is quoted on the website as seven minutes for prep and 25 minutes in the oven.  It actually went more quickly than that for me because I used the precooked medium shrimp from Aldi, so I only had to toss the shrimp with the tomatoes and let them warm, which only takes about 5 minutes in the oven.  This is one recipe that I don’t measure for at all.  Actually, when I made it this time I wasn’t paying close enough attention and I used only one can of tomatoes, and it still turned out great, which just goes to show it’s pretty fool-proof.  I use crumbled feta when it calls for goat cheese, and of course I use a bit more garlic than it calls for.

All Aldi ingredients


Plated up and ready to enjoy

As you can see, this is a pretty healthy recipe, without a lot of fat and tons of nutrients in the tomatoes.  It’s also economical—my entire menu tonight, down to the salt and pepper, came from Aldi.  To keep the healthy thing going through the meal, I served instant brown rice and a vegetable blend on the side.  I wouldn’t usually use “instant” anything, but real brown rice takes soooooo long to cook that I make this concession, and it helps keep the meal under thirty minutes.  I make it with chicken broth rather than water to give it a little extra flavor, and I leave out butter and salt.  The veggies just get a quick steam in salted water, and they’re ready to go at the same time as the rice.  Watermelon balls round out the meal and are an authentic Greek-style dessert.  Our dinner guest, Katie, provided a lovely wine to go with the meal.  It was clearly a hit—here’s a look at the table when we were all done!  I also have Katie to thank for being my photographer tonight.  She's the reason there are so many pictures this time!
All done!

Tuesday, May 24, 2011

Now That's How You Do Leftovers!

Remember when we had a pizza round left over when we made grilled pizzas, and I told you I’d let you know how it worked left over?  Well, the answer is it worked great!  The Rev was at his charity golf outing tonight, and when it’s just me and the kids, I can’t usually work up the motivation to really cook.  So, I picked up a take-and-bake pizza at Aldi for the kids (those pizzas are great, by the way, and only $5.99 for a 16-inch cheese pizza) and grabbed another ball of fresh mozzarella for myself.  While the kids’ pizza baked, I threw together a pizza for myself from last week’s leftovers.  I used some of the quick tomato sauce and sprinkled on a little shredded mozzarella I had left from making the kids’ pizzas on Friday.  I thought it would help "glue" the toppings down and help keep them from sliding all over the place.  Next I sliced a tomato into very thin slices on top of the shredded cheese and topped them with some fresh mozzarella rounds.  Meanwhile, I had melted a little butter in a small skillet and started sautéing the sliced mushrooms and green peppers that hadn’t made it on to the grilled pizzas.  Those went on top of the cheese, and I put just a little more of the fresh mozzarella on top.  By this time, the kids’ pizza was done.  I popped my creation in the oven at 375o on the pizza stone, because that’s the temperature the take-and-bake pizza needed.  The pizza round was fully cooked already, so I was just looking to melt the cheese and heat the sauce and toppings.  After about 10 minutes (it might have been less; I was watching the pizza and not the clock to know when it was done,) this is what I got:

Rock star leftovers!
It tasted every bit as good as it looks, and I felt good about myself because I got a great dose of veggies.  The only change I would make if I were doing this again would be to salt the tomatoes and let them drain on a paper towel for a few minutes before putting them on the pizza.  They released a lot of liquid on the pizza, which made it messy, but it still tasted fantastic!
I feel obligated to make this disclaimer:  leftovers are not usually quite this rockstar at our house.  Mostly leftovers get eaten for lunch pretty much in their original form.  Sometimes I heat them up for dinner when I’m feeling lazy.  Growing up, my mom used to make something she called “Presbyterian Supper,” which consisted of a mini-buffet of whatever was left from the previous few days’ dinners.  The churches I grew up in had regular (and delicious) potluck dinners, hence the name.  I don’t make Presbyterian Supper too often because The Rev eats lunch here almost every day, so leftovers don’t accumulate in the fridge enough to make a buffet.  Still, it’s a great way to use up perfectly good food!  When you’re tired of cooking, consider putting your microwave to work and tell your family it’s potluck night!